
Appearance
KAS F&B Nexus guide for managers & staff
Tiếng Việt: Hướng dẫn quản lý & nhân viên
Welcome. This handbook explains Nexus in everyday language—what you see on screen, what to tap or click, and how tasks and shifts work together. If Nexus looks different on a phone than on a computer, that is normal.
Floor & kitchen staff using the phone app (/mobile) should start with the dedicated floor employee guide.
For invite-only sign-in and HR roster setup, see Adding employees below and the floor employee guide for the staff-facing view.
Table of contents
- What Nexus is for
- How to access Nexus
- Brands — when your company runs more than one line
- Staff phones — feature by feature
- Manager computers — feature by feature
- How tasks reach people — three paths
- Putting someone on the calendar
- How it feels in real life — one week at a branch
- If something feels wrong
- Who this guide is for
1. What Nexus is for
Nexus ties together your team (who works where, in what role, and how to reach them), the roster (who works when), and tasks (checklists from playbooks / manuals). Tasks can land on someone because a manager sent them, because a playbook is set to repeat, or because the roster and automation are set up to drop the right checklist on the right shift.
Managers use Nexus on the Digital Manager desktop for six day-to-day hubs:
- Task Manager — assign checklists, author playbooks, monitor task streams
- Schedule & roster — build the calendar, publish shifts, review today’s roster and team availability
- Salinity — configure broth checks and follow up on missed slots
- Maintenance requests — approve and resolve facility / purchase tickets
- Recruitment requests — submit hiring needs (managers) or review them (HR)
- Settings — roster, branches, platform roles, notifications
Floor staff use the staff mobile app for tasks, manuals, schedule, time off, availability, and salinity checks—see the floor employee guide.
Schedules, roster “today”, and shift times use Asia/Ho_Chi_Minh (Hanoi, UTC+7) unless your IT team overrides SCHEDULE_TIMEZONE / VITE_SCHEDULE_TIMEZONE.
2. How to access Nexus
Nexus is a web app—there is no App Store or Play Store download. HR or IT gives you a company link, usually ending in /login (for example https://dev-nexus.kasholdingsfb.com/login). Open that URL, sign in with the email and password you were given, and you are in.
In strict onboarding mode you must already be on the roster and accept an email invitation before sign-in works—see Adding employees.
| Who you are | Recommended way to open Nexus | What you see |
|---|---|---|
| Managers & admins | Desktop — laptop or PC browser | Digital Manager: left icon rail with Task Manager, Schedule & roster, Salinity, Maintenance requests, Recruitment requests, and Settings |
| Restaurant staff | Mobile — phone browser or home-screen icon | Staff mobile: bottom bar (Home, Tasks, Manuals, Schedule); time off and availability in account menu |
You can use either layout on any device, but the table above is what most people should default to.
Managers & admins — Desktop (recommended)
- On a computer, open your company Nexus URL in Chrome, Edge, or Safari.
- Sign in. On a normal desktop screen you land in Digital Manager: a narrow strip of icons on the left and a large main area for Task Manager, Schedule & roster, Salinity, Maintenance requests, Recruitment requests, and Settings.
- Bookmark the page or keep the tab pinned—this is your day-to-day HQ view.
If you signed in on a phone and need the manager layout: tap your profile photo (top of the screen) → under Workplace view, choose Digital Manager. Your choice is remembered on that device.
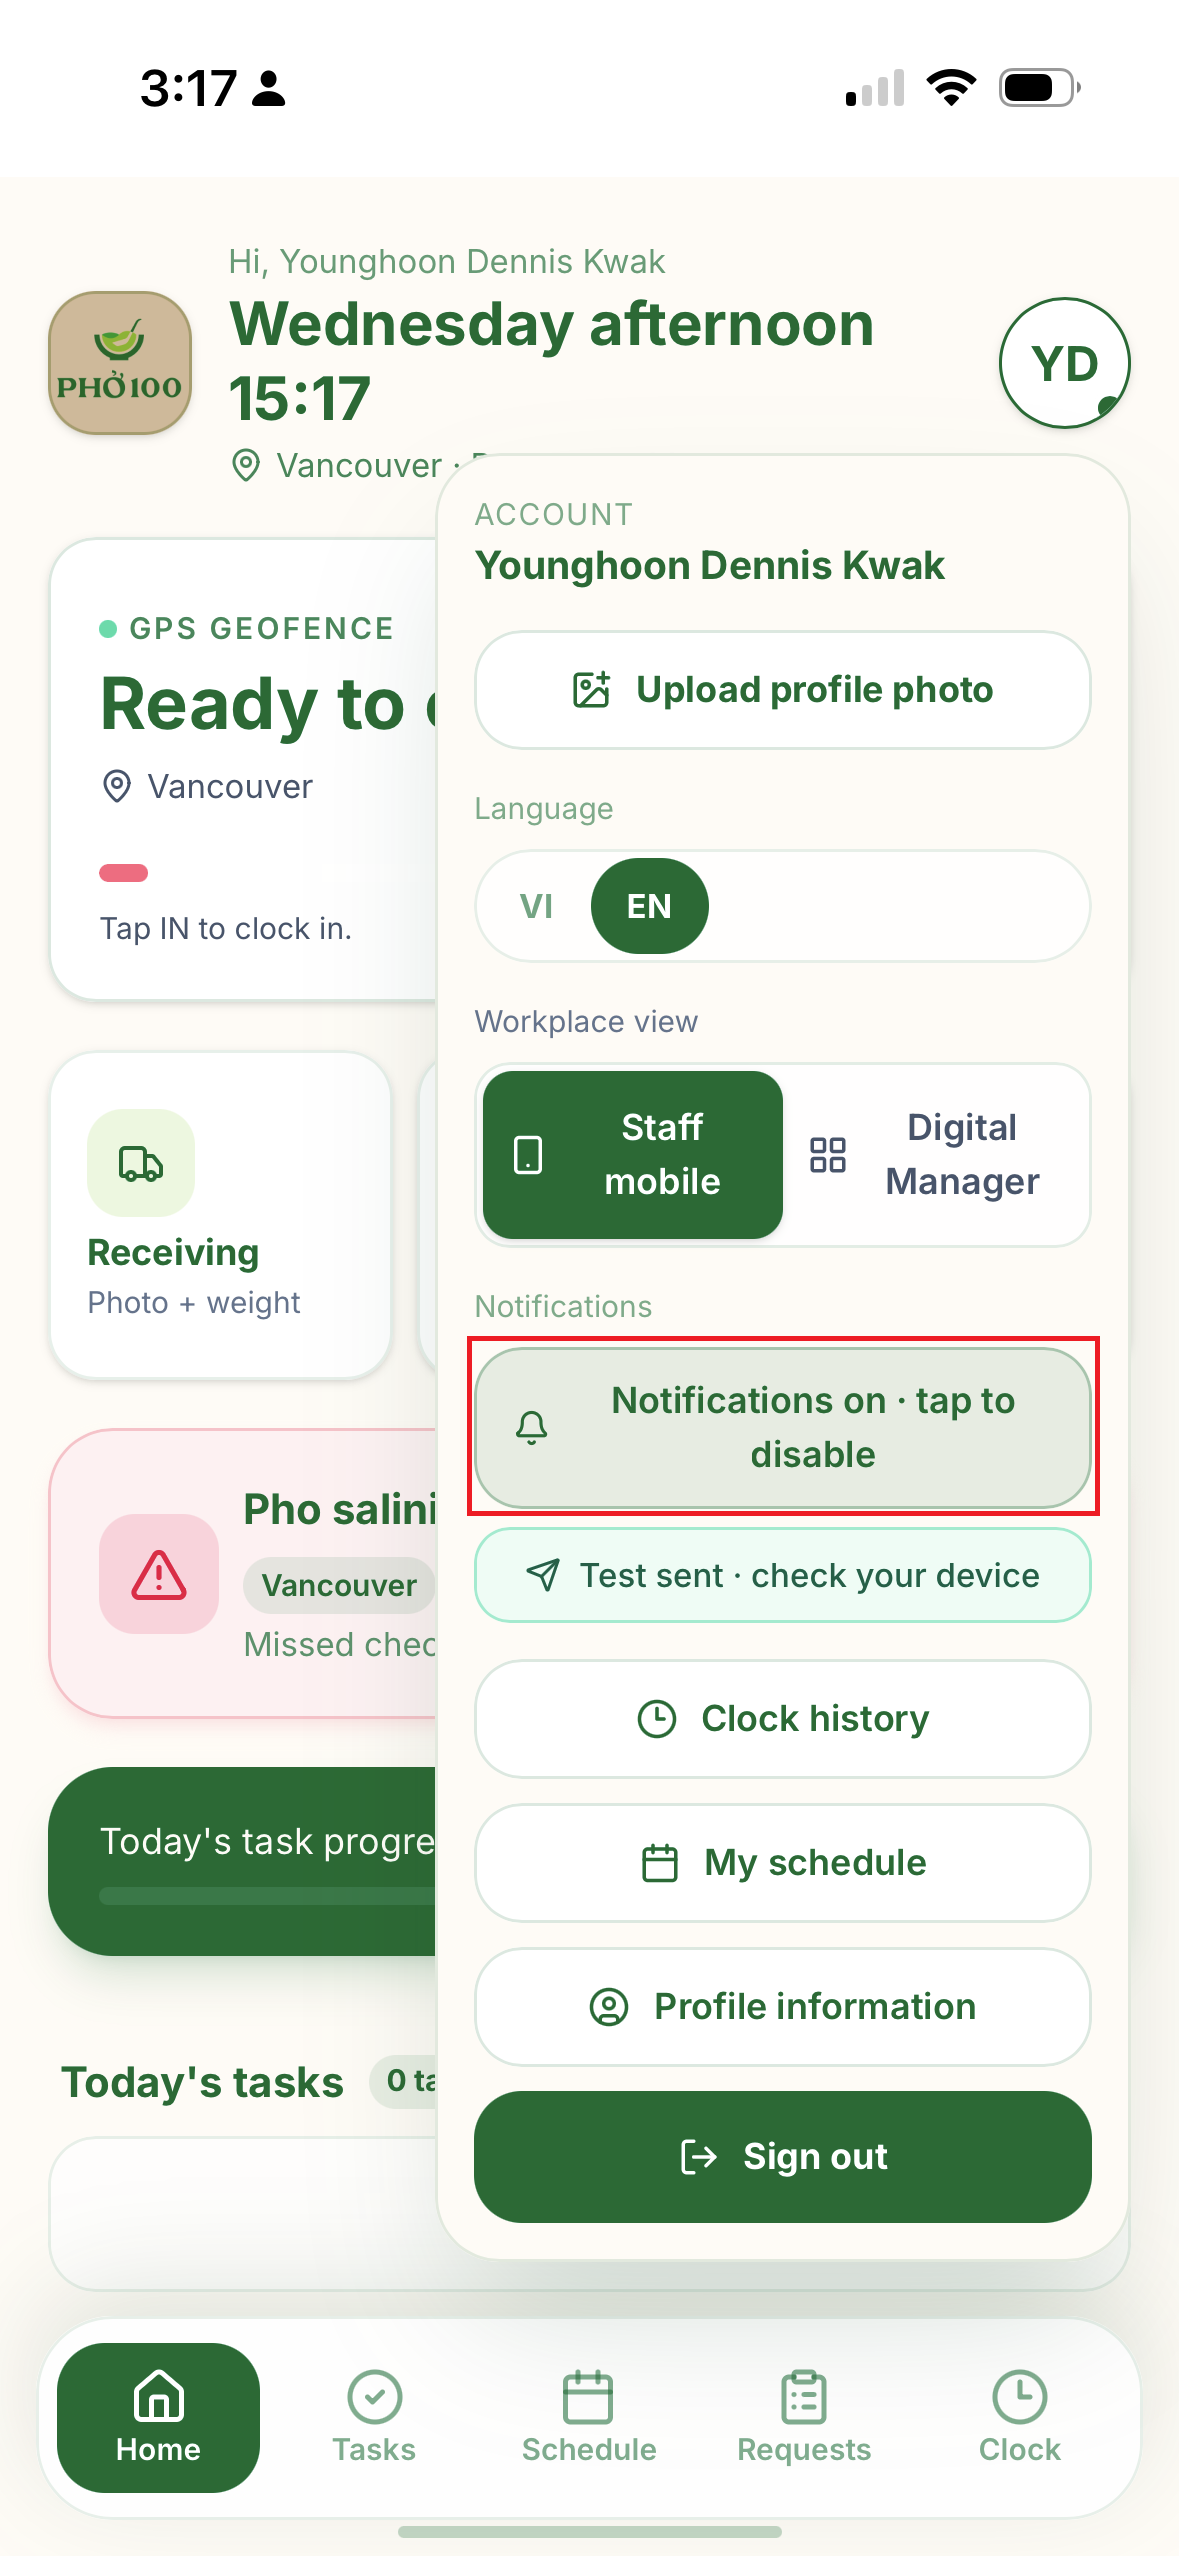
Force desktop on any device: add ?desktop=1 to the URL after login (useful when a manager opens Nexus on a tablet but wants the full workspace).
Restaurant staff — Mobile (recommended)
- On your phone, open the same company URL in the browser.
- Sign in. Floor staff always land in the staff mobile layout: main area plus a fixed bottom bar (Home, Tasks, Manuals, Schedule).
- For everyday shifts, add Nexus to your home screen (next section) and open it from there—it feels like a normal app and is required for reliable push notifications on iPhone.
Managers who only need to check tasks on the floor can switch to Staff mobile from the same Workplace view menu without signing out.
Add to your home screen (phone)
Do this once on the phone you carry at work. Install prompts appear only on the sign-in page (/login and Clerk subpaths such as /login/factor-one)—not inside the app after login.
On the login screen:
- Android (Chrome): a floating Install Our App button at the bottom when the browser supports install. If no button appears after a few seconds, a fallback banner at the bottom shows Chrome menu steps (
…→ Install app). - iPhone (Safari): a short guide at the bottom (Tap the Share button below and select “Add to Home Screen”). Dismiss with × if you prefer to sign in first and install manually later. Dismissal is remembered on that browser—you can still install manually anytime.
If you already open Nexus from a home-screen icon, these prompts stay hidden—that is expected.
Android (Chrome)
Open the company login link in Chrome (sign-in is not required to see the install button).
On the login page, tap Install Our App if it appears, and confirm.
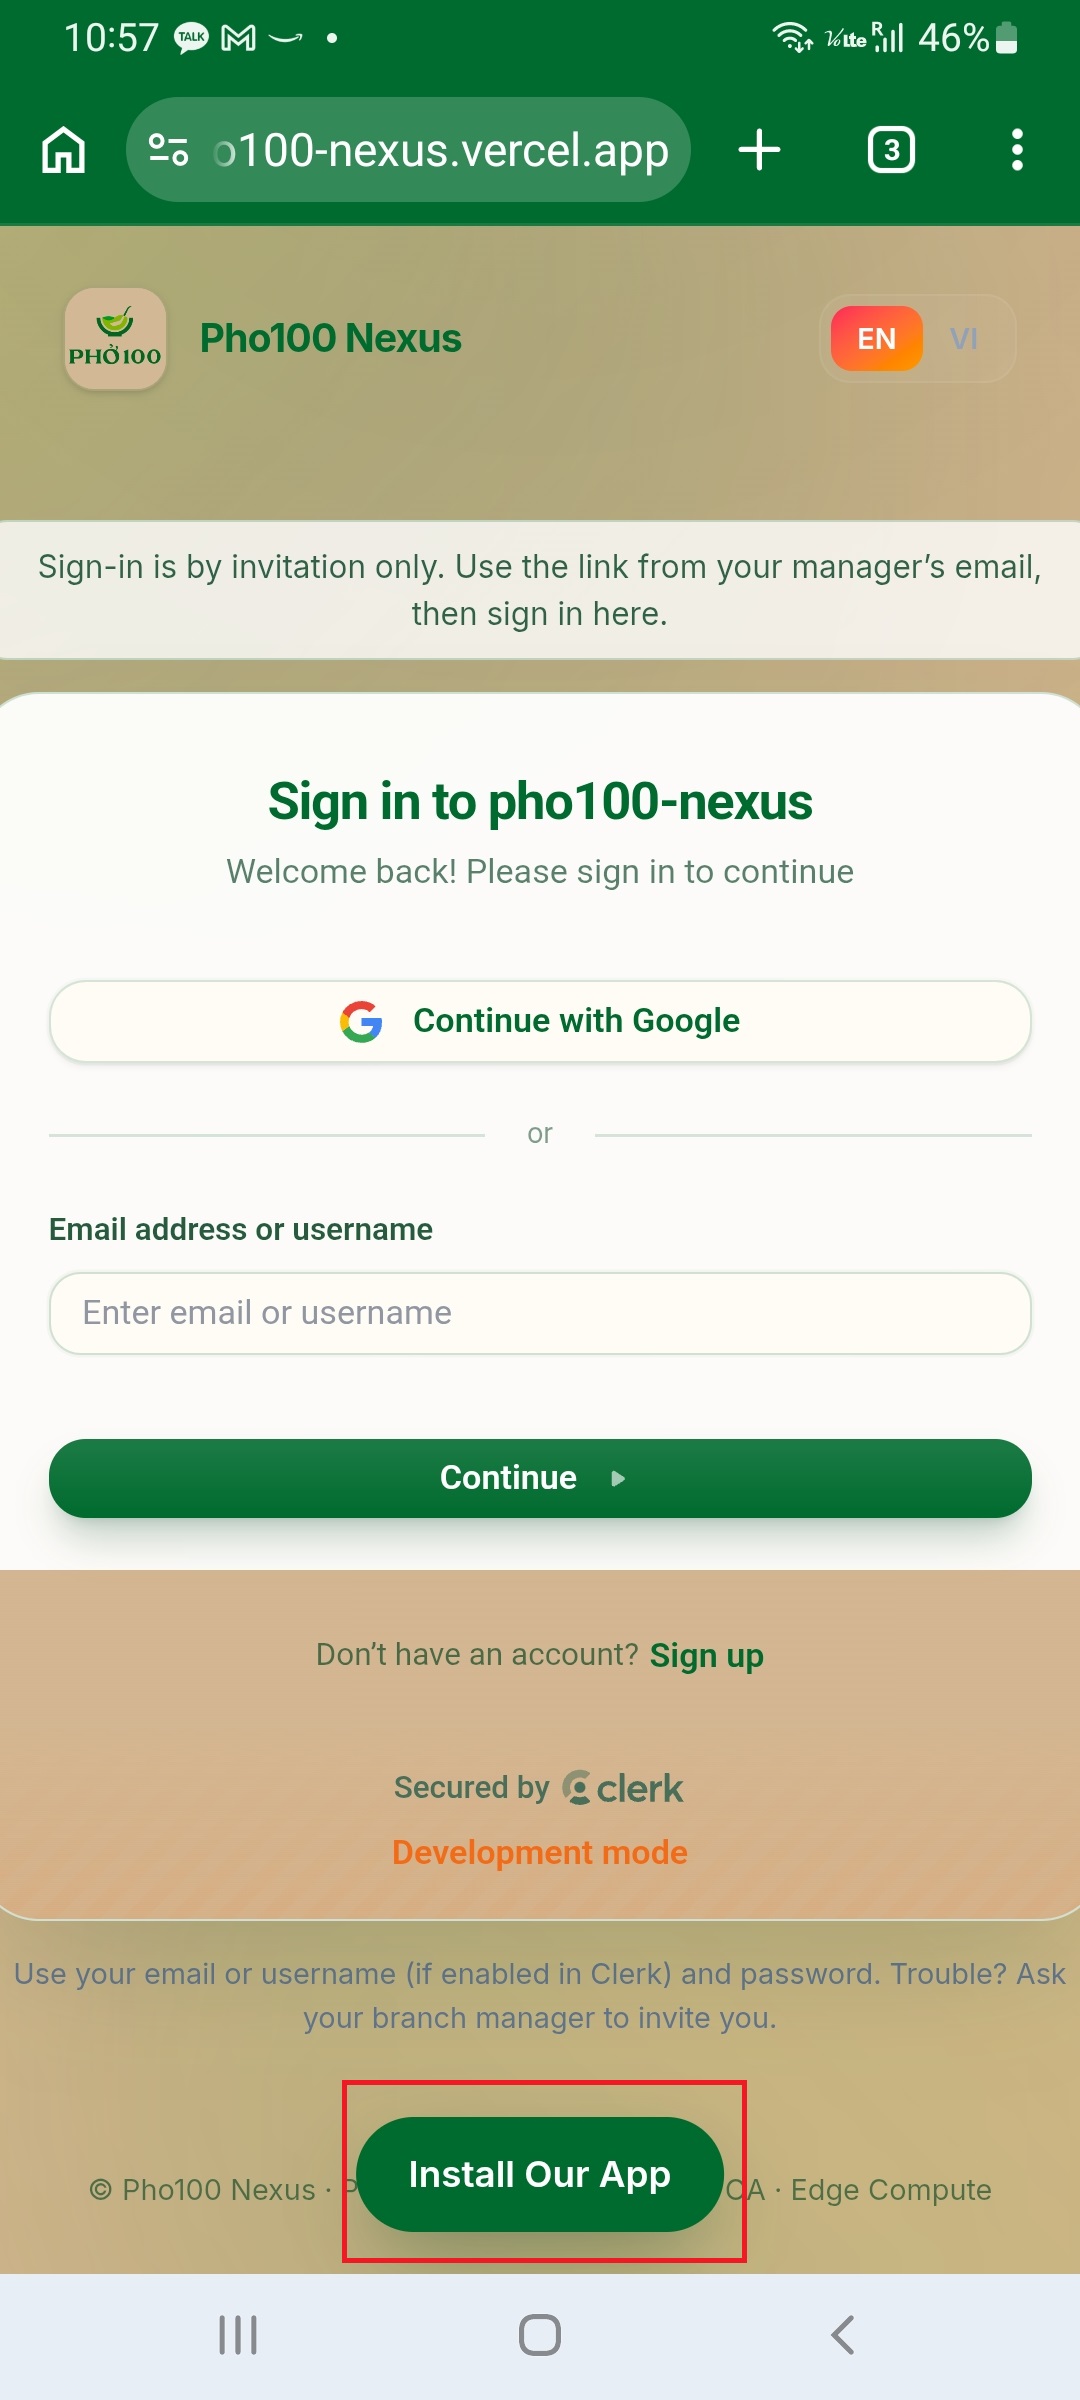
If no button appears after a few seconds, read the fallback banner at the bottom, or tap … (top right) → Install app or Add to Home screen → confirm.
Open Nexus from the KAS F&B icon on your home screen from now on.
iPhone (Safari)
- Open the company login link in Safari—Add to Home Screen does not work reliably from other browsers on iOS.
- On the login page, follow the bottom install guide if shown, or use the manual steps below.
- Manual path: tap Share (square with arrow at the bottom) → scroll → Add to Home Screen → Add.
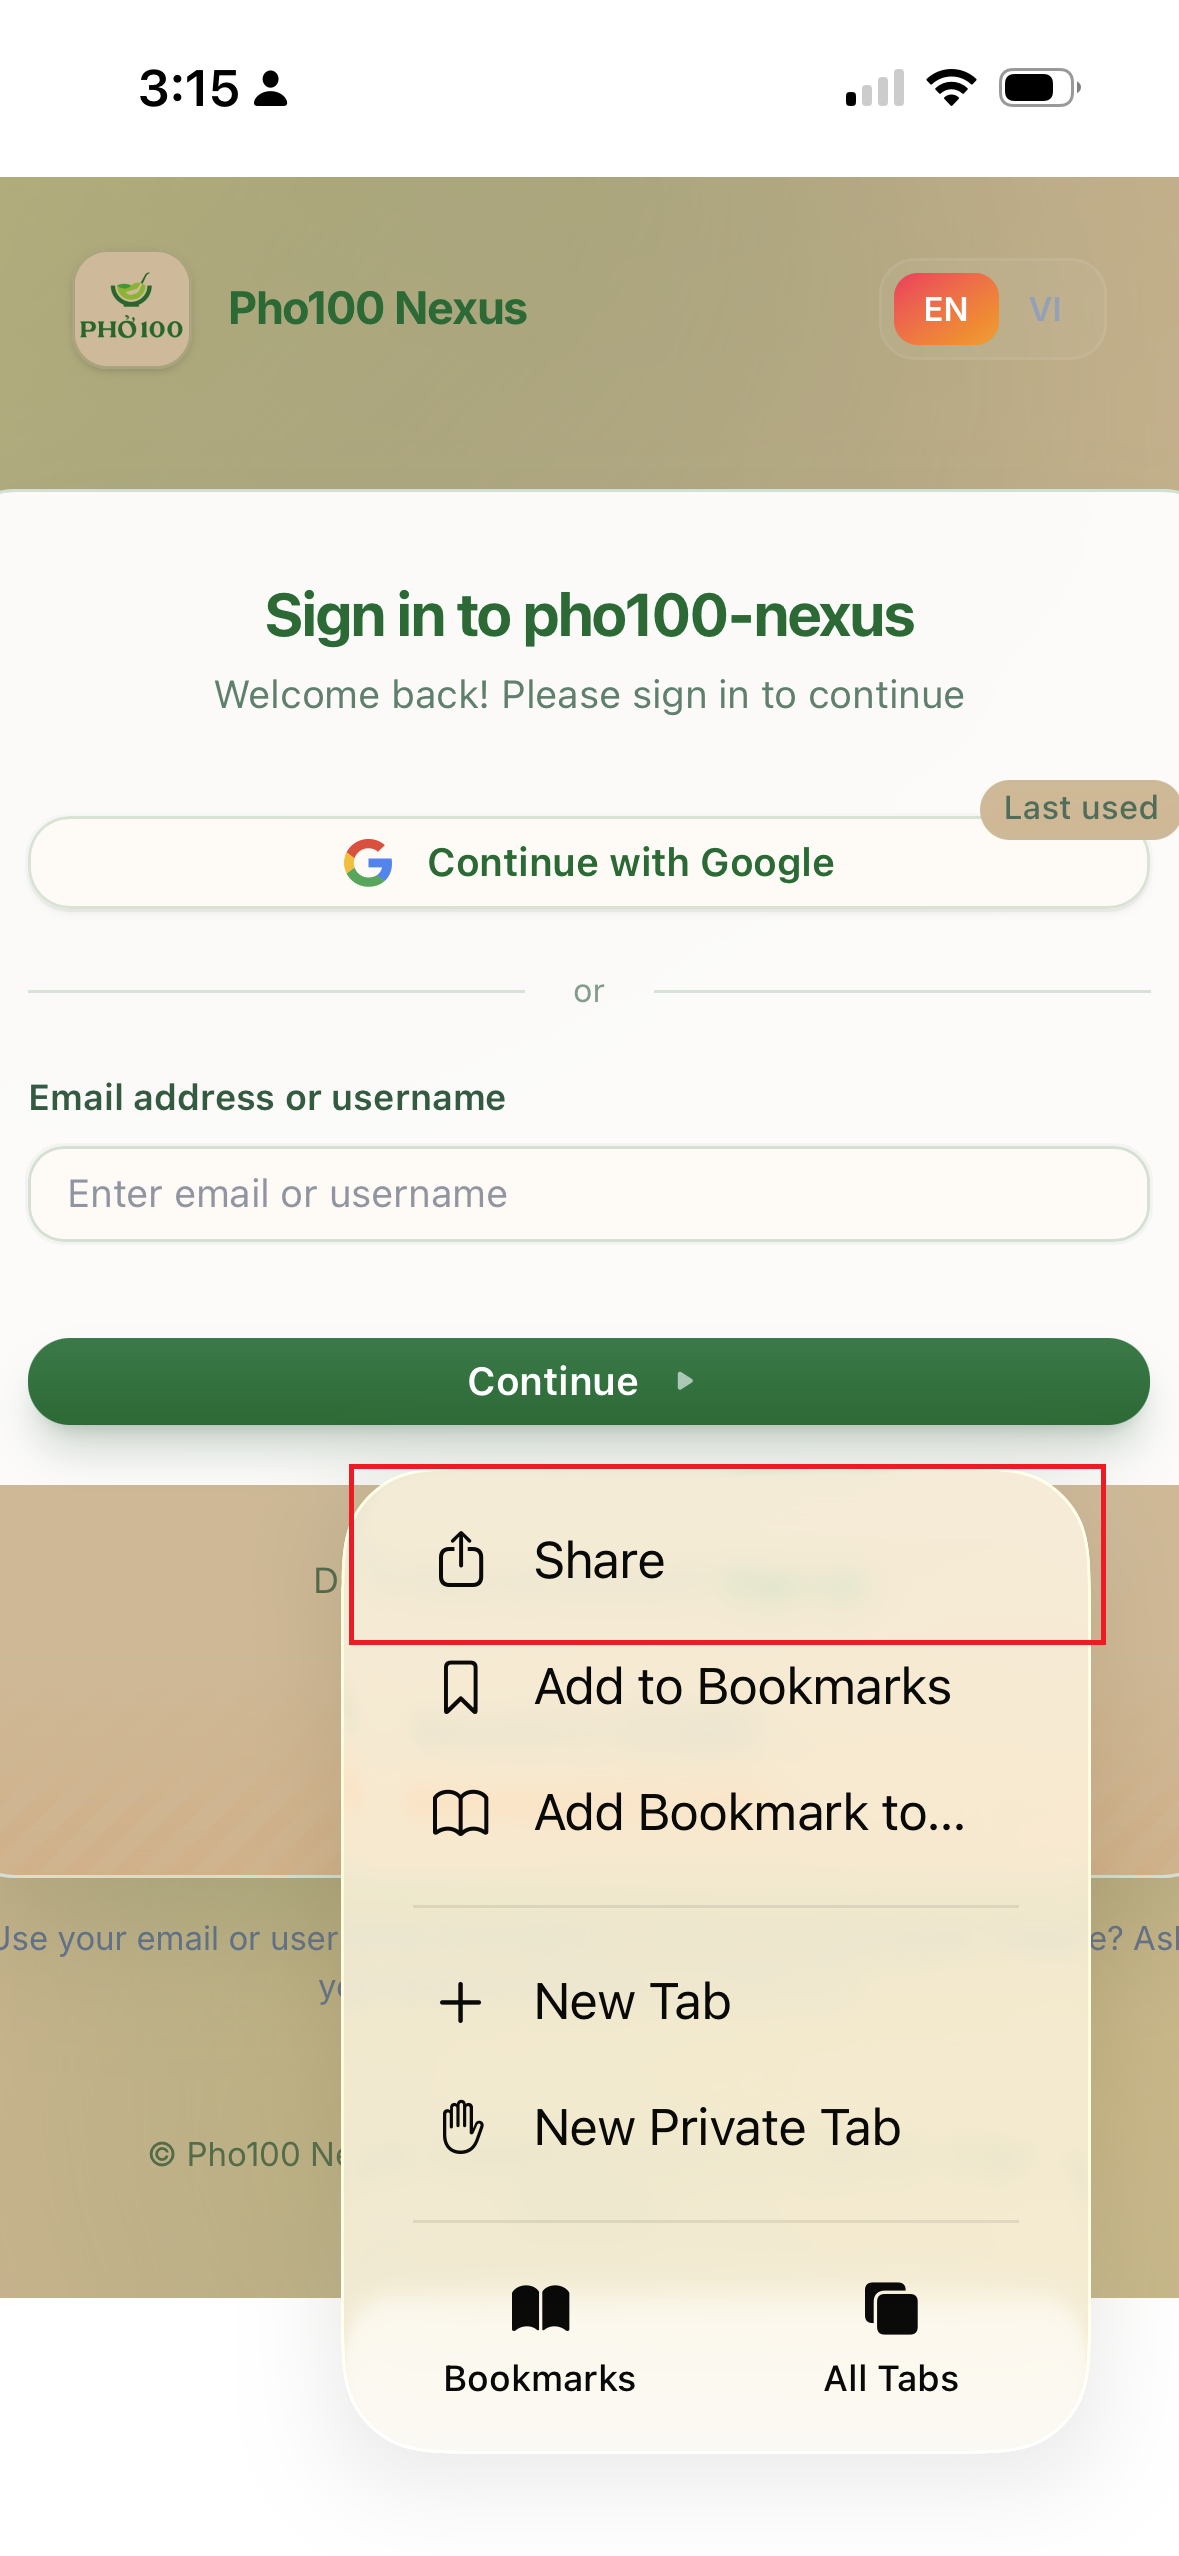
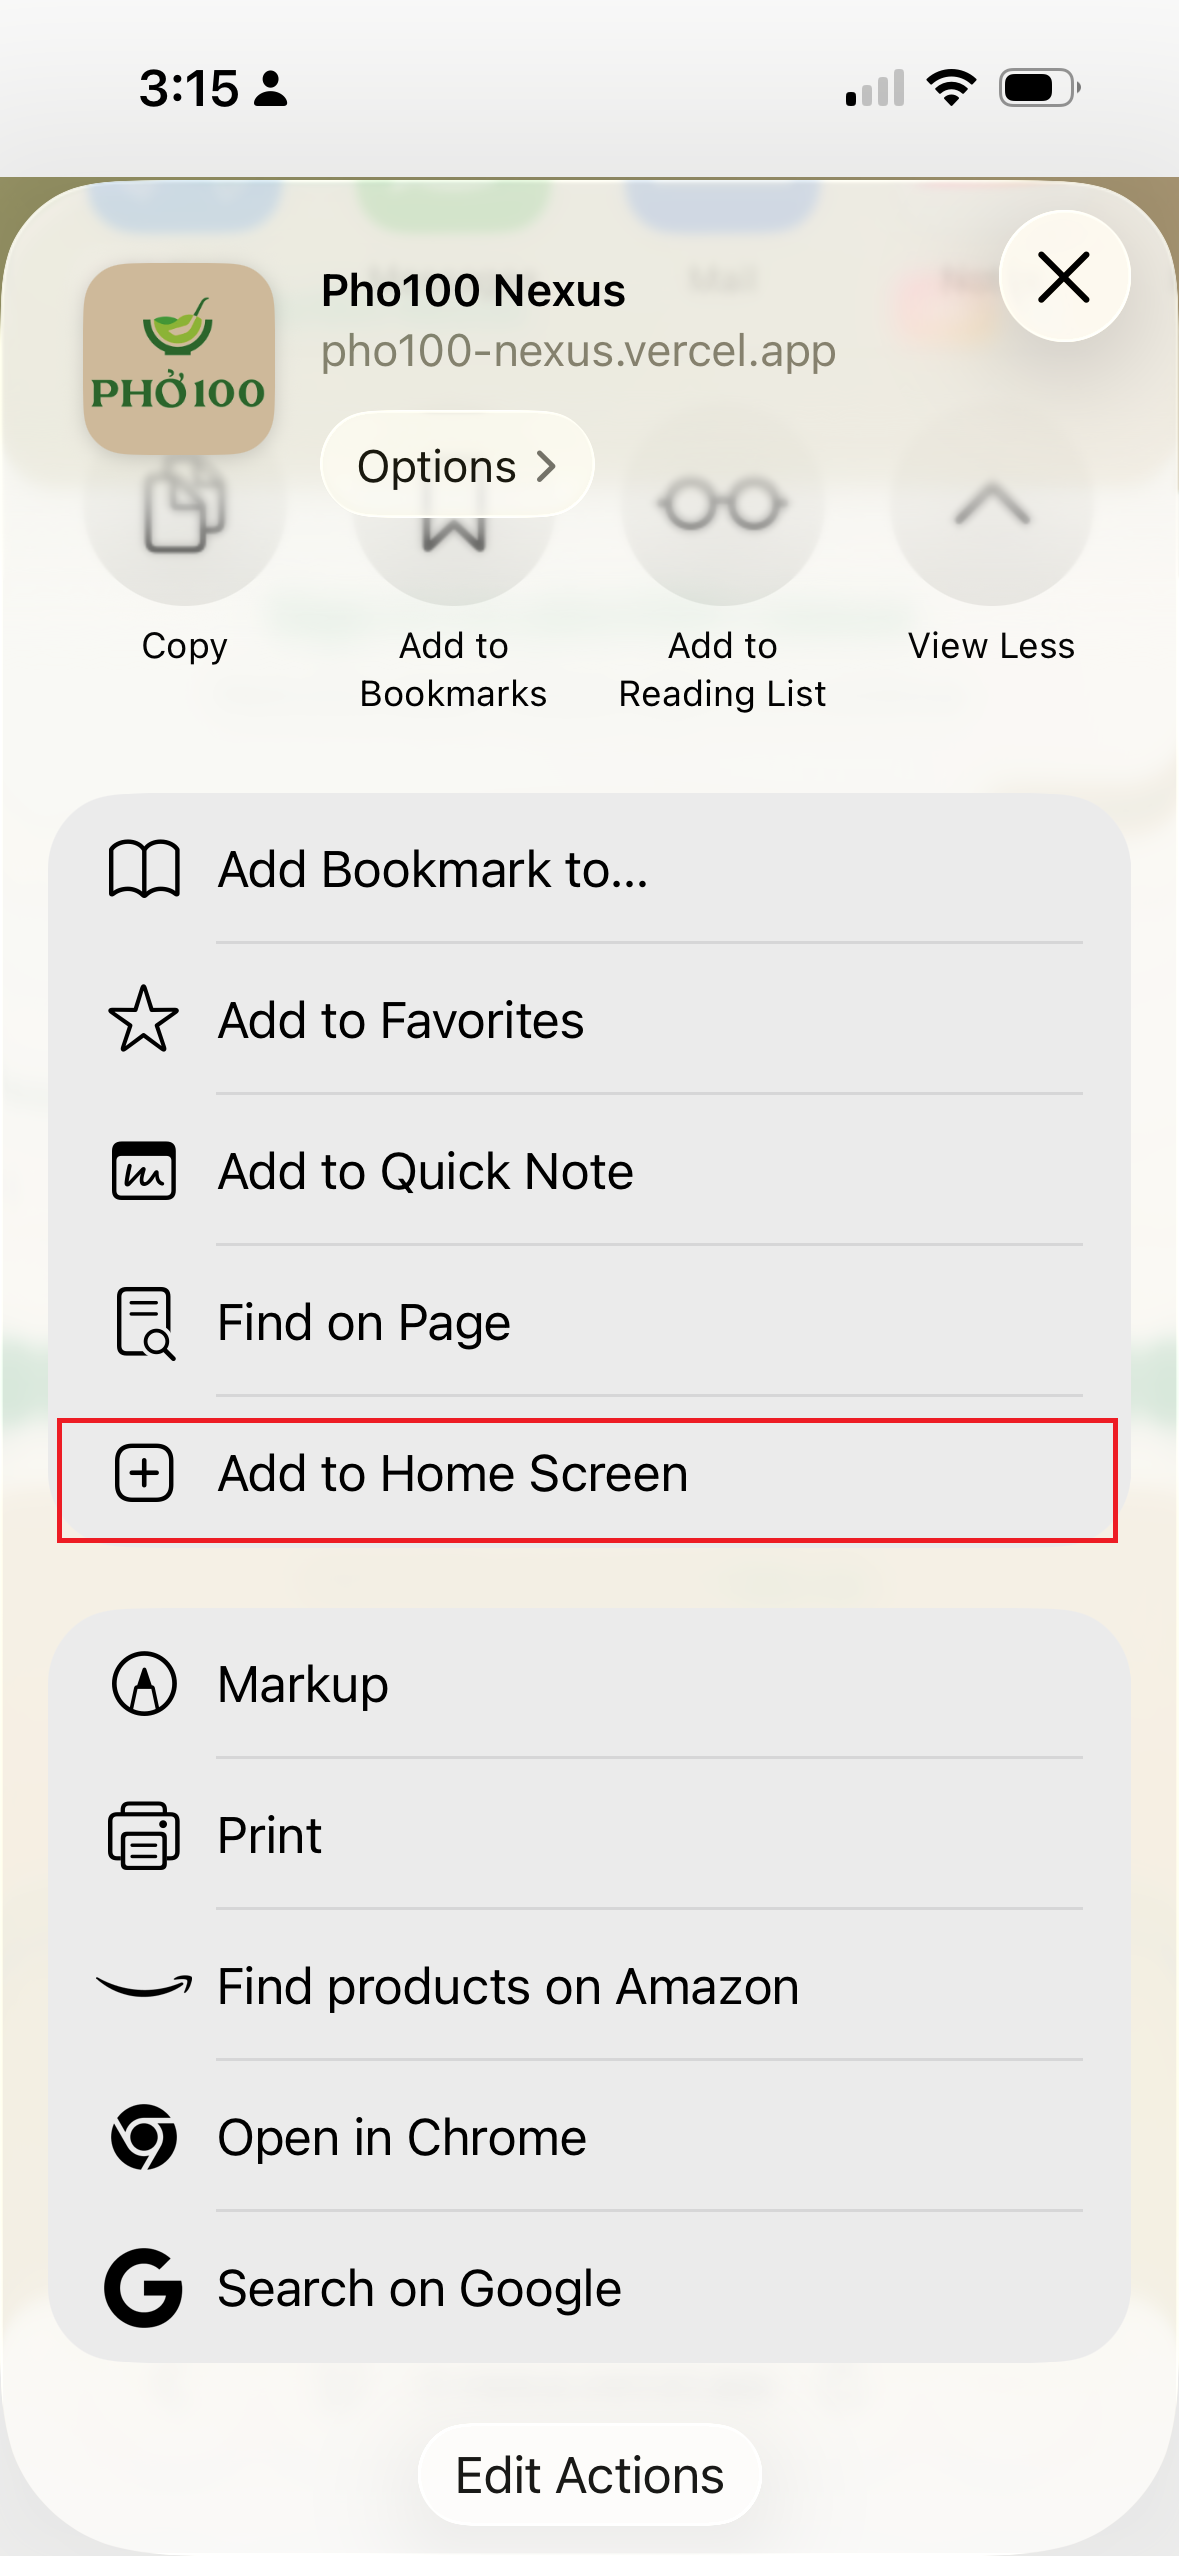
- Launch Nexus from the home-screen icon (full screen, no Safari address bar).
If you dismissed the login-page guide, you can still install anytime from Safari using step 3.
Enable notifications
Push alerts cover new tasks, overdue tasks, and (for some roles) salinity reminders. They only work after you allow them on each device you use.
Restaurant staff (phone, after home-screen install on iPhone)
- Open Nexus from your home-screen icon (especially important on iPhone).
- Tap your profile photo (top right).
- Under Notifications, tap Enable notifications.
- When the browser asks, tap Allow.
- Optional: tap Send test to confirm a alert reaches your phone.
Managers
- On desktop: open your account menu (profile area on the left rail) → Notifications → Enable notifications → Allow in the browser. You can also open Settings → Notifications for the same control plus alert type toggles (task assigned, overdue, salinity, team overdue).
- On phone: same as staff—profile menu → Enable notifications. Switch to Digital Manager first if you are managing from the desktop layout on a large phone or tablet.
iPhone requirements
- Install to home screen from Safari first (iOS 16.4 or later).
- Then enable notifications from the home-screen icon, not from a regular Safari tab—the app shows Add to Home Screen first until you do.
If notifications stay off
| What you see | What to do |
|---|---|
| Add to Home Screen first (iPhone) | Complete the home-screen steps above, then retry. |
| Notifications blocked | Open phone Settings → find your browser or KAS F&B → turn notifications on, then tap Enable notifications again in Nexus. |
| Notifications unsupported | Use Chrome or Edge on Android, or Safari 16.4+ with home-screen install on iPhone. |
After notifications are on, managers can fine-tune categories under Settings → Notifications (for example turn off salinity reminders if you are not on the broth schedule).
3. Brands — when your company runs more than one line
Some organisations run more than one brand (for example Pho100 and Quafe). Each brand has its own:
- Branches and roster context
- Item categories (yield catalog)
- Maintenance vendors and equipment catalogs
- Maintenance requests list
- Departments and position names
Switching brand (managers with access to multiple brands):
- Use the Brand dropdown on the left rail, or
- Profile information → brand workspace panel
After you switch, lists and settings reload for that brand. Creating a yield item or vendor under Brand A does not appear when you are viewing Brand B.
Creating a brand (HQ / IT): Settings → Brands — enter a unique display name; the system assigns a stable internal id.
Cross-brand staff: managers can assign an existing employee profile to another brand (Manage assigned brands on the employee). The person keeps one login; they switch brand in the app like above.
4. Staff phones — feature by feature
Floor employees: the floor employee guide covers
/mobilein more detail (home screen, notifications, tasks, manuals, schedule, time off, availability, and salinity).
Attendance not yet released: GPS clock-in and punch history are not available in the current mobile release. Time may be tracked outside Nexus until your company enables attendance.
Bottom bar (navigation)
Fixed shortcuts: Home, Tasks, Manuals (when the role includes playbook read access), Schedule. Whatever you tap fills the middle of the screen; the bar stays visible so you never get lost.
Home
What it’s for. Your morning glance: who you are in the system and whether today’s chores are moving.
What you see.
- Greeting and a line showing branch and position (job title) so you know the record matches reality.
- A Salinity check shortcut when your branch runs broth QA.
- A today’s tasks ribbon with a simple fraction (completed vs assigned). Tap it and you jump straight to Tasks.
Tasks
What it’s for. The checklist assigned to you for the calendar day Nexus calls “today” for the whole brand.
What you see.
- Lines with wording, deadlines, sometimes photos or videos you must attach before marking Done.
- States along the lines of new, started, finished.
Odd behaviour to expect. If a job vanishes overnight, it was probably tied to yesterday’s calendar day—not a glitch. One clock is shared roster-wide.
Manuals (bottom bar)
What it’s for. Read-only playbooks for your branch and position—opening/closing SOPs, prep guides, and similar templates managers maintain on desktop.
What you see. A searchable list; tap a manual for numbered steps, reference photos/videos, and evidence requirements. Completing assigned work still happens on Tasks.
Schedule (bottom bar)
What it’s for. Your shifts only, forward and backward a few weeks, grouped under dates. Today jumps out visually.
What you see. Start and end times, branch name, occasional tags managers use internally (for example payroll notes). Empty list usually means nobody published your row yet—or your branch on file does not match the calendar your manager edits.
Profile menu (tap your photo circle)
What it’s for. Extras without crowding the bottom bar.
What you’ll find.
- Time off—submit leave dates and track pending approvals.
- My availability—mark days and hours you can work (managers use this when building schedules).
- Language (English / Vietnamese where enabled).
- Upload profile photo so the roster face matches today’s haircut—optional but nice for managers scanning faces.
- My schedule—same shift list as the Schedule tab, often on a fuller layout with a back arrow.
- Profile information—see the next subsection; read-only for you.
- Sign out.
Profile information (full screen)
What it’s for. A calm read-only summary of what HR maintains on your card.
Fields you’ll see (labels may be English or Vietnamese):
| Field | Meaning |
|---|---|
| First name / Last name | Roster name parts (shown together as full name) |
| Full name | Combined display name |
| Employee ID | Internal id |
| Position | Your job title on the roster (Server, Grill, etc.) |
| Nexus role | Platform access (permissions)—not the same as position |
| Branch | Assigned location |
| Department | Optional grouping |
| Phone / email | Contact on file; roster email can differ from sign-in email |
| Start date | Hire or wage-effective date when recorded |
If you work for more than one brand, a brand panel lets you see and switch your active workspace.
Only managers change roster fields—they do it under Settings → Employees after you tell them something is obsolete.
5. Manager computers — feature by feature
Digital Manager is organized around six left-rail hubs plus your account menu (profile photo at the bottom). Everything below is scoped to the active brand at the top of the rail unless noted.
Dedicated step-by-step for Task Manager tabs: Task Manager guide.
Dedicated step-by-step for scheduling and salinity: Scheduling & salinity guide.
Left rail (icon strip)
What it’s for. Fast jumps without digging through menus. At the top you see the active brand name; use the dropdown when you manage multiple brands.
Typical icons (exact labels depend on language). You only see icons your Nexus role is allowed to read—dedicated HR users often see Recruitment requests only, not the full Operations workspace.
| Icon | Hub | Route |
|---|---|---|
| People | Task Manager | /admin — Task Streams, Task History, Manual Templates, Shift Templates |
| Calendar | Schedule & roster | /schedule — today's roster, team availability, shift calendar, time-off approvals |
| Droplet | Salinity | /salinity — today's checks, pho types, branch settings |
| Store | Maintenance requests | /maintenance-requests — facility / purchase tickets |
| User plus | Recruitment requests | /recruitment-requests — hiring proposals |
| Gear | Settings | /settings — employees, branches, platform roles, notifications |
| Avatar (bottom) | Account | Avatar, language, notifications, profile, desktop/mobile shell, sign out |
Some rollouts also show a Dashboard icon when your role includes it—that is optional and separate from the six hubs above.
Task Manager (/admin)
What it’s for. Everything about checklists and playbooks—who owes what proof right now, how templates repeat, and which shift windows templates bind to.
Four sections (tabs at the top of the hub):
| Tab | Purpose |
|---|---|
| Task Streams | Live feed of active checklist lines—filter by branch, position, assignee, playbook, date, overdue |
| Task History | Review completed or past assignments |
| Manual Templates | Author playbooks (recurrence, steps, photo rules, schedule-based auto-assign) |
| Shift Templates | Reusable shift time windows (e.g. “Lunch 10–16”) used on the calendar and in manual automation |
Daily actions in Task Streams:
- Slice by branch, position, assignee name, playbook, calendar day span, overdue-only, or combinations.
- Add a one-off line straight to someone without building a playbook.
- Bump status when a worker forgot their phone onsite.
- Open evidence viewers when photos are required proofs.
Daily actions in Manual Templates:
- Save playbook edits.
- Assign pushes an instant bundle—either one named person or every qualifying hat inside a picked branch. Pressing Assign twice usually creates two bundles, not overwrite.
Think of Task Manager as answering “who owes what proof right now?” and “which playbooks exist?” Calendar placement itself lives in Schedule & roster.
Schedule & roster (/schedule)
Detailed guide: Scheduling & salinity guide — shift grid, publish workflow, time off, staff My schedule, and salinity setup.
What it’s for. Who works when—drafting shifts, publishing them so staff see them on mobile, and coordinating availability and time off.
Four sections (tabs at the top of the hub):
| Tab | Purpose |
|---|---|
| Today's roster | Quick “who is on the floor today?” readout from published calendar blocks |
| Team availability | See and edit staff availability grids managers use when building the schedule |
| Shift schedule | Full calendar—drag blocks, apply shift templates, publish weeks, export CSV |
| Time off | Review and approve (or reject) staff time-off requests |
Shift schedule essentials:
- Draft blocks on people: drag durations, duplicate patterns, use helpers like fill from availability or run task auto-assign when configured.
- Publish so staff see shifts on mobile—unpublished drafts stay invisible on phones.
- Export spreadsheet downloads a CSV matrix (employees × dates) for the current day/week/month view.
Timezone. Calendar days and HH:mm shift times follow Asia/Ho_Chi_Minh (Hanoi, UTC+7)—the same zone as “today” on Tasks and roster automation. If times look shifted by many hours, ask IT whether SCHEDULE_TIMEZONE matches between API and frontend.
Charts in Task Streams and the calendar react when another manager edits—you both see fresh data within moments. Coordinate before overriding a block a colleague just placed.
Salinity (/salinity)
Detailed guide: Scheduling & salinity guide — pho types, branch notify list, slot statuses, mobile capture, and acknowledge workflow.
What it’s for. Scheduled broth salinity checks with photo evidence, grouped by broth type (pho type). Acceptable reading ranges are set per type, not per branch.
Three tabs:
- Today's checks — timeline of slots for the selected branch, with a Broth type column; filter by branch; acknowledge missed rows (optional note).
- Pho types — brand-global broth types: name, interval (often hourly), grace period, reminder lead, min/max range, active time window. Define schedules and ranges here first.
- Branch settings — per branch: Enable salinity, assign which pho types apply, and pick a searchable notify list for reminders and missed-slot alerts. Reminders go to notify recipients who have overlapping shifts.
Two-step setup: create pho types under Pho types, then enable each branch and assign types under Branch settings.
Staff flow: the Salinity check tile on staff mobile appears only when the branch is enabled and at least one pho type is assigned. Staff record a reading, attach a meter photo (AI may suggest the reading), and submit; schedule slots are grouped by broth type.
Maintenance requests (/maintenance-requests)
What it’s for. Facility issues and purchase requests: submit, approve/reject, resolve with evidence photos.
Per brand:
- Request list and filters
- Vendors catalog (hub tab or Settings link)
- Equipment catalog used on tickets
Tickets belong to the active brand and a branch. Approve or reject from desktop; staff may submit from mobile when your rollout grants that permission—resolution and catalog maintenance happen here.
Recruitment requests (/recruitment-requests)
What it’s for. The digital form Phiếu Đề Xuất Nhu Cầu Tuyển Dụng—branch managers request new hires; HR reviews, approves, rejects, or marks Completed when someone is hired.
Who does what.
| Role | Typical access |
|---|---|
| Branch manager | Create requests (branch, department, position, headcount, job description, requirements). Submit to HR. Track status on the list. |
HR (HR Nexus role) | Open Digital Manager → lands on Recruitment requests (not full Operations). Approve, reject with reason, or mark completed. |
| HQ / IT | Tune permissions under Settings → Platform roles (recruitment_requests, admin_shell read for HR). |
Where to open it.
- Desktop: left-rail User plus icon → Recruitment requests (
/recruitment-requests). - Mobile (managers): profile menu → Recruitment requests when your role has read access.
Workflow statuses: Pending HR → Approved / Rejected / Cancelled → Completed (after hire). HR-only users approve or reject—managers cannot self-approve.
Settings (/settings)
Open from the left-rail gear. Most tabs apply to the active brand unless noted.
| Tab | Purpose |
|---|---|
| Employees | Roster cards: name, branch(es), position, Nexus role, department, contacts, hire date, wages, assigned brands |
| Brands | Create organisation brands (HQ) |
| Branches | Location names for filters and calendar |
| Platform roles | Select a role → edit description + permission matrix (Create / Read / Update / Delete per feature). Old ?tab=permissions URLs redirect here. |
| Positions | Job titles for this brand (Server, Grill, …)—not platform access |
| Departments | Optional department names for this brand |
| Notifications | Your push preferences; link to salinity notify configuration |
Vendors, equipment, and shift templates are managed from the Maintenance requests and Task Manager hubs, not as separate Settings tabs.
Workers read roster fields back via Profile information; managers own edits.
Platform roles — who gets what access
Nexus ships six canonical platform roles (Nexus role on the employee card—not the same as Position, which is job title):
| Role | Who it's for | Digital Manager | Data scope |
|---|---|---|---|
| IT Admin | Platform administrator | Yes | All branches, full configuration |
| Brand Manager | Brand-wide operations lead | Yes | All branches; platform roles & settings read-only |
| Restaurant Manager | Store general manager | Yes | Assigned branch(es) only |
| Head Chef | Kitchen lead | Yes | Assigned branch(es) — salinity, BOH tasks, schedule |
| HR | Human resources | Yes (recruitment hub) | Recruitment requests only |
| Server | Floor staff | No | Staff mobile app |
Branch-scoped managers (Restaurant Manager, Head Chef) see only their assigned branches in filters and data (Tasks, Salinity, Schedule, etc.). If lists look empty, confirm at least one branch is checked on their employee card.
Legacy Manager role: older databases may still have a Manager row with full cross-branch access—it is not the same as Restaurant Manager.
To adjust access: Settings → Platform roles → select a role → edit description and permission matrix → Save permissions. Notable row: Admin shell (Operations) grants the Digital Manager desktop (usually only Read matters).
Adding employees — step by step for HR
Managers (and HR staff with manager access) add people to the roster before those people can sign in—especially when your company runs strict onboarding (invite-only; no public sign-up).
Before you start
- Sign in to the manager desktop workspace (wider layout with the left icon rail).
- Confirm the active brand at the top of the left rail matches where this person will work. Roster rows are created in the current brand context; cross-brand access is added later if needed.
- Have the new hire’s work email ready when strict mode is on—without it, the system cannot send a Clerk invitation.
Steps
- Click the gear icon on the left rail to open Settings.
- Open the Employees tab (roster table with search).
- Click Add (plus button, top right of the table).
- In the New employee form, fill in at least:
- First name and Last name — roster display name is built from these (last name optional).
- Branch — checkbox list of one or more locations (must match branches your calendar uses). Select all branches this employee can access. Filters and data are limited to these branches. The first selected branch becomes primary on the roster card.
- Nexus role — platform access (what they can open in Nexus), not their job title. Choose from canonical roles such as Server, Restaurant Manager, Head Chef, Brand Manager, HR, or IT Admin.
- Position — job title on the roster (Server, Grill, etc.) from this brand’s position list.
- Work email — required for invitations in strict mode; invitation is sent to this address.
- Optional but useful: Phone, Department, Employment start date, Full-time / Part-time, and hours by weekday if your rollout uses them for scheduling hints.
- Click Save. The system assigns a unique Employee ID automatically—you do not type one when creating.
After save (strict onboarding)
- A success message confirms the invitation; the accept link may be copied to your clipboard so you can paste it to the hire if email is slow.
- The new person receives a Clerk invitation email, sets a password, then signs in at your company
/loginURL. - On first successful sign-in, Nexus links their login to the roster row (by work email). They then see tasks, schedule, and profile like everyone else.
- If email never arrives: use Resend invitation on that employee’s row in the table (mail icon), check spam/junk, or paste the accept link from the success toast. Any work email provider works (company domain, Outlook, Gmail, etc.)—delivery issues are usually spam filters, not the address type. On Clerk development instances, mail often comes from
@accounts.dev; corporate filters may quarantine it until IT allowlists the sender. Pending invites can also be resent from the Clerk Dashboard → Users → Invitations.
Editing or fixing a card
- Click the pencil on the employee’s row to change branch assignments, position, Nexus role, contacts, wages, or hours. The employees table shows multiple branch chips when someone works at more than one location.
- Manage assigned brands (inside the editor, on existing employees) lets one person work in more than one brand without a second login.
- Staff see updates on Profile information shortly after you save; they cannot edit those fields themselves.
Common mistakes
| Mistake | What happens |
|---|---|
| Wrong work email | Invite goes to the wrong inbox; fix the email and Resend invitation. |
| Position confused with Nexus role | Person has the wrong job title on profile vs wrong manager permissions—set Position = job, Nexus role = access. |
| Branch typo or missing assignment | Schedule tab stays empty for that person until branch matches the calendar. Branch-scoped managers need at least one branch checked. |
| Restaurant Manager confused with legacy Manager | Restaurant Manager is branch-scoped; old Manager rows (if any) have cross-branch access. |
| No roster row before sign-in (strict mode) | Sign-in blocked with a “not on roster” style message—create the employee first. |
History
Task History (in Task Manager) reviews past checklist activity. Clock history (team punch audit) will appear when attendance is enabled in a future release.
6. How tasks reach people — three paths
Three mental models—pick consciously.
Path A — Just this once
From Task Streams, fabricate solitary lines—pick coworker, words, deadline, evidence demand. Useful for “walk-in fridge died—inspect seal now”. No playbook file required.
Path B — Push a playbook button
From Manual Templates, hit Assign.
- Pick individual ⇒ every step hits exactly them.
- Pick spread across position / branch hats ⇒ each matching teammate receives their duplicate deck.
Reminder: duplicates happen when Assign is mashed twice impatiently—not a harmless refresh gesture.
Path C — Let the roster do it tonight
Only daily or weekly playbooks sync through calendar automation—not “runs once unless I click” booklets.
| Playbook setting | Everyday effect |
|---|---|
| Named shift flavour tying manual to roster template | Matching shift blocks carry the playbook; neighbouring roles stay clean. |
| Window of clock time spanning part of shift | Anything overlapping qualifies—looser when flavours drift lazily labelled. |
| Neither tightened | Broad overlap—good for company-wide habits, risky if everyone inherits everything. |
Weekly adds weekday tick boxes (Mondays-only training, etc.). Your company can also delay when tasks appear—often so phones do not buzz hours before the shift.
Repeating nightly passes suppress duplicate spam thoughtfully when they run twice—distinct from frantic double Assign taps.
Details tie to section 7 whenever someone freshly lands on roster stone.
7. Putting someone on the calendar
Picture dragging Minh onto Wednesday evening Host:
- Minh exists visibly roster-side that slice.
- The next automatic pass runs—could be right after you save, or overnight, depending on how your company configured things.
- Nexus asks which daily / weekly playbooks love Minh’s hat + corridor that evening slice.
- Rules from section 6 decide who gets which checklist lines from the roster.
Calendar truth still lives in human managers coordinating loud service—automation only hands out paperless checklists consistent with what you drew.
8. How it feels in real life — one week at a branch
Imagine District 7 this week—mix of kitchen, servers, new inspection drama, and one tired host checking whether Thursday still exists.
Khánh works Grill most suppers. The lead builds a daily playbook with three hop rows—stock tasting, oil rotation, photo of cleaned hood—scoped to Grill and either tied to the supper shift template or pinned to a clock window that hugs real fire times. Khánh’s blocks sit on the calendar supperside. After the manager hits the refresh-from-roster style control (or the overnight pass runs), Khánh’s Tasks tab lights with those three lines that same calendar day—that is the automatic roster path from section 6, so the lead never hand-texts “hood again” nightly.
Tuesday inspection fallout: leadership wants Lan alone running six wipe-and-photo stations—once only, not every Monday forever. They spin a one-time playbook—not daily—and Assign individual to Lan (Path B). Nobody else’s phone chirps; Lan’s deck is private busywork.
Wednesday garnish push: every Server must read a two-line tonight script before floor. Manager keeps branch District 7, position Server, toggles Assign everyone in that hat (still Path B). Seven phones, seven identical micro lists—done before ticket rush.
Salinity: scheduled broth checks per pho type (often hourly) run through Salinity; if someone misses a slot, managers on the branch notify list get a push and acknowledge it after follow-up.
Maintenance: a broken mixer gets a maintenance request ticket; the manager approves under Maintenance requests and later marks resolved with proof—vendors and equipment picks come from that brand’s catalogs.
Recruitment: the District 7 lead submits a recruitment request for two part-time servers (replacement hire). HR opens Digital Manager, sees only the recruitment hub, approves the ticket, and later marks it Completed after onboarding—without needing access to the full Operations board.
Meanwhile Lan keeps opening the Schedule tab wondering if Thursday host still exists—Tomorrow looks empty—so they message the group; the manager admits the draft was never published. Minh changes phone number midday; someone with access updates it under Settings → Employees, and Minh opens Profile information a few minutes later and sees the new number.
Stories like these stack into one rhythm: roster lines on the calendar, playbooks wired for repeat versus once, the Assign button when you want everyone in a hat, salinity follow-up, maintenance tickets, recruitment handoffs, and tidy employee cards—all so floors stay legible without anyone needing to know how the machinery works behind the glass.
9. If something feels wrong
| What you notice | What to try |
|---|---|
| Tasks list empty unexpectedly | Wrong calendar page scrolled silent? Overnight roster job lagging—ask supervisor. Rarely mismatched nickname vs roster spelling hides rows—manager filters Streams by fuzzy name spellings once. |
| Automatic bundle never manifested | Confirm playbook truly daily/weekly. Slot/window tightening in section 6 aligns with drawn block—not one-shot manual. Weekly weekday unchecked? Whisper delay tightening still sleeping until closer to buzz. |
| Schedule tab sterile | Rosters unpublished for your corridor—or roster branch typo vs calendar—you need tidy card under Employees. |
| Profile reads broken / onboarding message | Payroll row not sewn to login identity yet—elevate calmly to HR—not something staff hotfixes live. HR should confirm roster row + invitation under Adding employees. |
| Maintenance ticket invisible on another brand | Requests are per brand—confirm active brand on the left rail. |
| HR cannot open Digital Manager or sees blank manager view | HR needs admin shell read and at least one hub permission (usually recruitment requests). Ask HQ to check Settings → Platform roles for the HR role. |
| Manager sees empty filters / no branch data | Restaurant Manager and Head Chef are branch-scoped—confirm at least one branch is assigned on their employee card under Settings → Employees. |
| Salinity tile missing on staff phones | Manager must enable salinity for the branch and assign pho types under Salinity → Branch settings. |
| Schedule times off by ~14 hours | Confirm SCHEDULE_TIMEZONE / VITE_SCHEDULE_TIMEZONE are both Asia/Ho_Chi_Minh in that environment. |
Who this guide is for
Restaurant supervisors wiring playbooks plus coworkers living tasks on the floor. Headquarters sometimes prints PDF handouts alongside this electronic version.
Related: Floor employee guide (mobile access, home screen, notifications)